Laminate floor installation 101
Home hacking isn't just about home networking or other X10 kind of things. After moving into my new place, doing some remodelling and becoming a familiar face at Home Depot, I see that home improvement is really like hacking. You need to become familiar with the system, the tools and rules and come up with your own solutions for your unique situation.
A month or so back, my fiancee and I spent a couple week-ends installing laminate at our new place. Installing yourself saves a lot of money and isn't too hard. But the more you understand about the process beforehand the easier the task will be.
I'll try to share some of the tricks I learned.
Introduction:
Laminate is a plate of composite wood (the core) with a decorative layer of resin on top, which is imprinted to look like wood. Compared to hardwood, laminate is much cheaper, doesn't need to be glued or nailed down and is quite resistant to scratches and stains.
The latest planks don't require any glue to hold the planks together, instead planks just need to be clipped together. The edge of the laminate surface will be held down by trim or transition pieces.
Laminate has an Achilles heel: water. If water goes into the grooves between the planks, it will be soak the core and cause it to swell. So laminate is generally not recommended for kitchens or bathrooms. It is possible some special laminate may be all right for these (using waterproof glue to fill the grooves or something?), but I haven't researched it.
Before you even buy laminate, you need to verify that the laminate + pad will fit under the doors when you open them and the trim . Also you need to think ahead about what areas may be troublesome, and what transitions you'll need.
Tools:
- Laminate: Various brands, colors and qualities are available. Pergo is a popular brand. I got my laminate from Ikea, because it is cheaper and it apparently is manufactured by Pergo as well. They have a couple of choices, that vary in thickness (7 or 8 millimeter, the thicker the better apparently) and have slightly different clipping solutions (try clipping a couple of planks before buying, some mechanisms are easier to assemble and some are more robust). You need to figure out how many boxes you need, including a 10% safety buffer.
- Underlayment: Laminate is noisier and harder than carpet, so you need to put a pad under it to make it more comfortable and quieter. You need to use different kinds of pads depending on what type of floor you have (concrete, plywood,...) and what floor your on (2nd floor and up need to use a pad with better sound isolation).
- Kit: A laminate kit comes with spacers, a hitting block and some other little tools. The block is the important part, as it protects the planks of laminate from your hammer. I got the Pergo kit (at Home Depot) and was happy with it. Also, you need to know how many spacers you'll need and may need to get some additional ones.
- Measuring tape.
- Saw: I used a miter saw for cutting the end of the planks, a skilsaw to cut the planks lengthwise and a hand saw for the details.
- Goggles and gloves: Protection gear useful during the cutting.
- Pencil: Essential!
- Various: Level (to check your floor is flat), painter's tape (to prevent the laminate from chipping when you cut it and guide you when you cut it with a hand or skil saw), cutter (for the pad), crowbar (for the trim), garbage bags, broom and vaccum.
Checklist:
Before you start putting the new floor down you need to take a couple of steps.
- Remove the previous flooring. Carpet is not too difficult, but time consuming. You might also need to remove your trims (that laminate needs to go under the trim).
- What is your floor like, underneath? Having plywood made things easy for me, but if you have concrete or some other subfloor, you may need to take some extra steps.
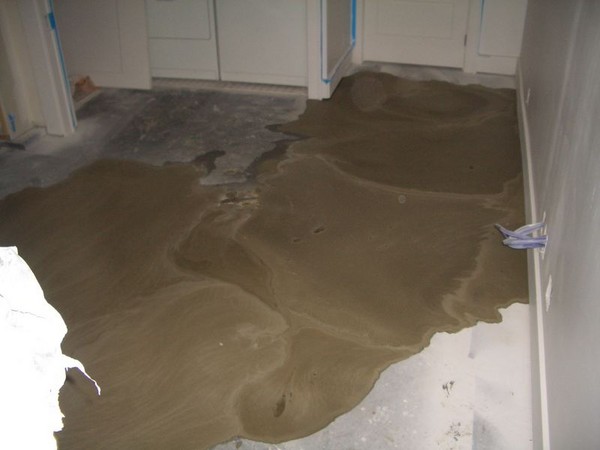
- Is your floor level? If your floor had waves or bumps, the laminate won't lay flat and won't fit nice and tight (the seams will show). Self-leveling compound can be used to make your floor level. I haven't needed it so far though.
- Are your walls straight and square?
- Take a look at Home Depot's "Flooring 1-2-3" book and check out the free classes they offer.
Tricks:
- Think about the specifics of your room before you go to the Home Depot class, so you can ask more details relevant to your room.
- Choose an orientation: usually you orient the laminate in the same direction as the light comes into the room. That way the seams will look nicer.
- Think ahead: before you start clipping whole lines of laminate, think about what kind of cuts you'll need to do as you reach the opposite walls. You don't want to end up cutting a 2 inch wide piece of laminate.
- When you cut a plank, one side might get chipped by the saw, depending which way it rotates. Try it out on a small piece to check if you need to cut planks top side down.
- Keep the left-overs from your cutting, they will come in handy as you reach the opposite walls.
- I've seen some pieces that had some damages on their edges. Mark these with a pencil so you can clearly see the damage and keep the plank with your left-overs.
- The cut from the saw has a certain thickness. Try the saw to see you to line your cut with your pencil mark.
Trim:
- Trimming was actually harder than putting the floor, because most of the imperfections in cutting laminate are hidden by the trim, but the trim cuts are more apparent. Of course, wood paste, sanding paper and paint can help in hidding some trim problems.
- Angles are not square, walls are not vertical. You can use little pieces of trim to test angles before actually cutting the final pieces, to see how square the corner is.
- Don't hit the nails in completely, this way you can correct any mistake more easily.
- Start with a corner that isn't as visible, so you can practice.
- Find studs by looking at the old trim nails or using a stud detector (note there is usually 16 inches from stud to stud). You'll use longer nails going into the studs, to hold the trim.
- Read Home Depot book and talk with the folks that work there, which are so helpful.
- Trim is a bit flexible (in both directions), so you can bend it slightly if the wall or the floor aren't perfectly flat.
- Always cut a bit too long first and then adjust.
- Cutting both the laminate and the trim generate a lot of dust. You can buy cheap thin plastic covers to protect furniture or isolate different areas of your place. When you start cleaning up, start from the top.
Read some more about The Basics of a Laminate Floor.
______________________________________people like us do it yourselfers, appreicate people like you who take the time to post this information. we are selfs are planning to install a laminate floor at home-going in pretty much blind!!! printing these do and donts will definately help us alot !!!!
thank you.
Posted by: DONNA (April 5, 2005 12:12 PM) ______________________________________Thank you for posting this. We have purchased our flooring and have ripped up the carpet. We have linoleum in our kitchen, it is not going to be as easy to remove. Can we install over the linoleum? Thank you!! Holley
Posted by: Holley (August 24, 2005 08:52 PM) ______________________________________I'm doing the same, however I googled for how to finish the trim - getting the corners done is proving harder than the rest!
The section about the walls not being straight is absolutely true - if you have to trim the ends, check it further along as what was the correct trimming at one end may be well off at the other, especially if your end wall isn't straight either (so the floor sits very slightly diagonally)
Posted by: Martin J. Green (September 28, 2005 07:30 AM) ______________________________________I'm glad to find this. My dh is trying to install laminate in our house and contrary to all the glowing reports on how easy it is! he's having trouble, just can't seem to get it to lock together like it's supposed to. Help! please
Posted by: donnalee (not the same as above) (September 30, 2005 07:09 PM) ______________________________________Hi,
coincidentally (as Donnalee's reporting) I am having difficulties in "snapping-in" together the planks of the IKEA's "Span" model.
A contact with the local Ikea store "guru" suggested some possible exposure to humidity of the box I am using ! Unfortunatelly the second one did not produce any better results.
Unless of some... special trick (I am not aware of...) it appears to me that something is wrong with the design of the planks themselves.
Any comment, idea or suggestion will be apreciated.
tks
Posted by: frafel3030 (October 3, 2005 08:07 PM) ______________________________________Really glad I stumbled on this. The tip for painters tape to prevent chipping when sawing is great. Thanks a lot!
Posted by: Andy Derrick (November 8, 2005 02:31 AM) ______________________________________I have read about using asphalt shingles to level a floor. Will this work for laminates? Thanks!
Posted by: bill stewart (January 15, 2006 12:40 PM) ______________________________________I'm not sure, but I've used self-levelling compound. Aren't shingles
for roofing?
Yes, I do believe asphalt shingles are for roofs. And "bailing wire" is for bailing. But the wire has rescued me on several occasions. I am seeing references on sites for shingles as "levelers" with good results posted. I suspect I will go with compound however.
Posted by: doc54 (January 16, 2006 09:31 AM) ______________________________________a great Tip:
Place a full row down (cutting)planks as required without snapping them together. This will allow you to adjust end pieces to be as long as possible and joints that are staggered.
y.L
Posted by: yorck Lindner (February 16, 2006 03:38 AM) ______________________________________Quick question. I just sealed my concrete floor, which has a few little uneven spots. Not sure how uneven they are and if it will matter.
I was told to lay sheets of plywood on my existing floor (glue them to the cement). This would take care of my leveling since the sheets of plywood are large.
Any ideas?
Is there a planner or calculator to help to "optimize" the cutting so that the materials left over from one row can be used on another row down the line? There's got to be a great calculation to make this easy, and reduce wasted materials.
Thanks!
Kirk
Kirk,
Is there a calculator to avoid waste with laminate? Not to my knowledge.
But I'm not sure it's needed, you can figure it out on your own: first, use the left over piece from a row to start the next row if it's size permits, and re-use left over pieces whenever possible...
I have installed Armstrong brand laminate flooring in the past and I know how well the planks should lock. I recently bought some SPAN flooring from IKEA and pulled a few out of the box to check out how it fits together. They need to be tapped into place with a tapping block. I am going to start my project soon and I plan to use glue to hole the seams together.
Bottom line...At .69 cents per foot, you get what you pay for.
Posted by: Nathan (March 19, 2006 06:06 PM) ______________________________________I bought laminate to do all of my house except my wet area's that are tile. I just had new base board put in after my house flooded. The guys at the laminate place said I had to cut the bottom of ALL the base board so the laminate could slide under (not just the door jams)! They then said I would cover it with the 1/4 round. I have over 1400sq ft of laminate to do! I went to lowes tonight to talk over what kind of tool I could use with out having to remove all those newly installed baseboards... they said I didn't have to cut them. So do or don't I... I have looked all over the net and can't find any info on cutting them. Any idea's on this? I need idea's fast.. I'm living on concrete floors right now and a husband thats deployed to Iraq! HELP!!! Thanks :o)
Kanina
Kanina,
You don't have to cut your baseboards, but the laminate floor cannot go right up against them. Need 1/4inch at least gap around all the walls. What you can do is leave the gap, and once the whole floor is done attach 1" quarter round to your baseboards. This will hide the gap you have and also give you a nice finish. PS if you currently have quarteround on your baseboards remove them before they start. Finally attach the quarteround directly to the baseboards with a nail gun, not to the floor, and fill the gap with white flexible caucking, to create a nice finish. Good luck.
What brands of flooring are people using? Any brands to stay away from?
Has anyone purchased from BuildDirect.com? They have cheap prices, but I'm not sure about the Robina, Kronotex and Kronoswiss brands. Any experience with any of these?
Has anyone had a good experience purchasing flooring online? What site(s)? Thanks.
Posted by: Mike (May 4, 2006 11:13 AM) ______________________________________Has anyone attempted to glue down a pergo snap together floor? Just curious. I was given enough pergo to do my livingroom but I hate that hollow sounds pergo gives off and wanted to glue it down right to the concreate.
Posted by: tommy (May 21, 2006 07:49 AM) ______________________________________We installed the IKEA Tundra floor in our 350 square feet room this past week. Took about 30 hours (including ripping out the carpets etc).
Notes:
1. DO NOT use the Ikea block (plastic) - they make the boards chip. Use a wood block instead - we lost a LOT of boards before we learnt this lesson.
2. Ikea TUNDRA floors DO NOT have a shine. If you are looking for that glossy look, this floor is not for you. Ex. Pergo has more shine IMHO. But at 1.29 a sft, who can complain?
3. Cutting the boards throws up a sandstorm. The dust gets into EVERYTHING.
4. The interlocks work very well. In fact I dont remember even a single piece not locking in - except in cases where the tongue or lip was broken.
5. Patterns - it seemed like one particular pattern occupied 60% of the planks - this made it kinda hard to vary the pattern. May just have been my luck perhaps.
6. Underlay etc - we put a generic brand poly sheet (from Home Depot - 1000 sft roll for 40 odd $s), then laid the NIVA fiberboard underlay (better insulation and noise reduction than the NIVA poly) and then laid the planks on NIVA.
7. Some edges were off a wee bit -we bought a MiniWAX wax pen and are in the process of filling the gaps. Dunno what this does to the so called warranty though.
8. 2 ppl required - in the beginning when the floors were truly free floating it helps to have 2 ppl - one to stand on the edges as the other taps the planks in.
All in all - IKEA floors are great value for money. However if you are looking to get a Ferrari at this price, remember you get what you pay for!
Good luck!
Posted by: IKEA Floored (June 17, 2006 05:29 PM) ______________________________________Queston? How to find low spots in cement floors?
Do i wet the floor or what?
Dean C.
Hi Dean,
I'd recommend that you check out the books at Home Depot or Lowe's. I think that they use a long 2x4 piece of wood with a level.
I erased mary's comment by accident:
"Help! My husband and I used the self-leveling compound, and it is quite bumpy. I think we used too much, how do we fix it??
Thanks!"
Hi Mary,
Unfortunately I don't know how to deal with that situation. Check with your local home improvement store. Depending on what is underneath the compound you may be able to break it and start over?
We are remodeling a condo, replacing all floors. I will have a pergo type floor butted up to carpet. Which is better to install first, the carpet or laminate? I would so appreciate your opinion! Thanks.
Dana
Posted by: Dana (August 29, 2006 01:30 PM)