I started to use Git more regularly and was curious about its design. Pro Git is an excellent and free book on using and understanding Git. I’ll share some minimalist notes I took on Git’s internal design. The design is simple and elegant. It’s been very enjoyable to learn about.
Object model
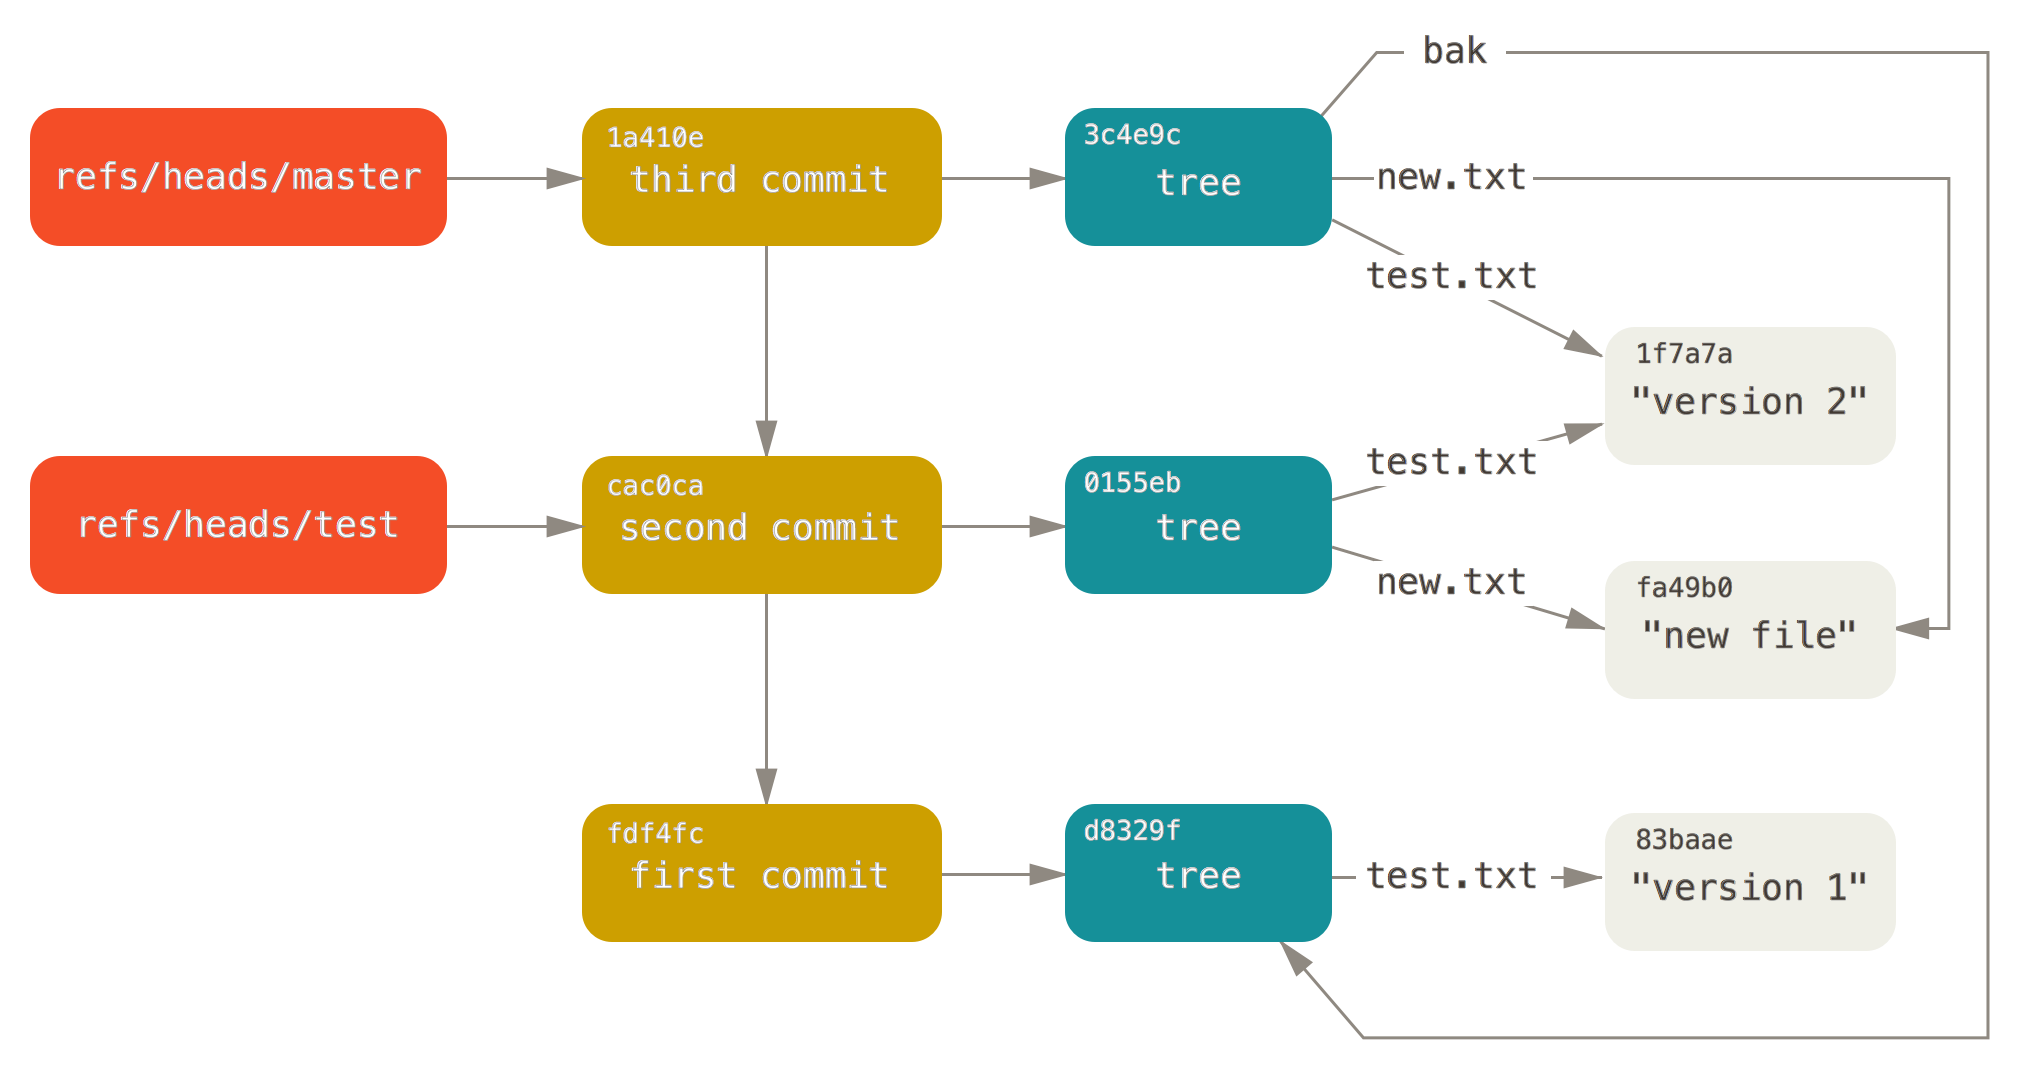
The Git object model has three types: blobs (for files), trees (for folder) and commits. Objects are immutable (they are added but not changed) and every object is identified by its unique SHA-1 hash.
A blob is just the contents of a file. By default, every new version of a file gets a new blob, which is a snapshot of the file (not a delta like many other versioning systems).
A tree is a list of references to blobs and trees.
A commit is a reference to a tree, a reference to parent commit(s) and some decoration (message, author).
Then there are branches and tags, which are typically just references to commits.
This illustration (borrowed from Pro Git) shows branches, commits, trees and blobs and their relationships:
High-level Git commands (init, add, commit) are the most common way of manipulating the object model (and its underlying stored representation), but Git also offers a number of low-level commands (for instance to create a blob object).
Storage format
Let’s move on to the physical storage of those objects. All the repository data is stored in the .git folder, which has the following structure:
objects/
refs/
HEAD
config
description
hooks/
info/
We’ll cover objects, refs and HEAD.
Objects folder
The .git/objects folder looks like this:
<SHA-1 named files>
pack file and index file
All objects are store in this folder, using their SHA-1 identifier as filename (the first two characters of the identifier are used as sub-folder). The objects can optionally be packed, in which case they get moved into a pack file, which comes with an index file.
As we’ve seen, each type of object holds different kind of information:
blob (contents of a file)
tree (list of filenames, each with a SHA-1 reference and an object type, which can be normal, executable, symbolic link or directory)
commit (reference to toplevel tree, author information and commit message)
Each object type has a specific serialization to file. For instance blob objects are serialized as “blob <space> <content length> \0 <content> <linefeed>” which is then compressed with zlib.
Pack file
As you commit multiple versions of a file, the objects folder grows and contains a lot of duplication. A git command allows to pack the objects. This creates an index file and a pack data file.
The index is a list of SHA-1 object identifiers that got packed, and for each, some information for finding the object in the pack data file.
The data can be stored in different ways in the data file (either a snapshot or a delta), so depending on the case the index row will contain different information:
Simple or snapshot index entries have an identifier, object type, object size, and start/end offsets for finding the blob in the pack data file.
Delta index entries have an identifier, object type, the SHA-1 identifier of the baseline object, and start/end offsets for finding the delta blob in the pack data file.
When git packs the objects, it decides which objects to keep as snapshot and which to keep as delta.
references folder
The .git/refs folder looks like this:
refs/heads
refs/tags
refs/remotes
All the objects we have stored so far can only be accessed if you know their identifier. The branches and tags are ways to keep a handle on a few of those identifiers, by giving them a friendlier name and allowing to enumerate them.
heads contains files named after branches. Each holds the SHA-1 reference of a commit object. tags contains files named after tags. Each contains the SHA-1 reference of a commit object (for simple tags, without annotations).
Finally, the file .git/HEAD contains the pathname to the head file (for instance refs/heads/master) which you currently have checked out.
Mobile browsers don’t support extensions like their desktop counterparts and most don’t have an ad blocker built-in. But it turns out that iOS (and probably Android and Windows Phone) supports good old “proxy auto-configuration” (PAC).
PAC is a mechanism by which the operating system uses a simple script file to choose when to use a proxy. The script receives the host and url of each web request and tells the operating system whether to connect directly (as normal) or instead use a proxy.
The trick is to use a blackhole proxy (which returns no content) for urls that are recognized as advertisement, based on a list of known domains and url patterns.
So I dug up an existing ad-blocking PAC file which seems somehow up-to-date (no-ads version 5.125 from John LoVerso), configured the blackhole proxy to Google’s DNS server (8.8.8.8 port 53), and updated my iOS wi-fi settings to point to it. I tested in Chrome on iPhone and iPad and this method seems to work.
You can try this solution by following the instructions below, but please read the security considerations below first.
You should note that PAC only works for wi-fi in iOS, not on cellular or other connections.
Also, you should know that iOS 9 may have official support for ad blocking extensions. The details are not yet known.
How to install
On iOS, go to Settings > Wi-Fi and open the configuration for the wi-fi you’re connected to. At the bottom, switch the HTTP proxy option to “Auto” and copy and paste http://blog.monstuff.com/ad-block-pac.js into the box.
Security considerations
Configuring a PAC file into your operating system can be dangerous. If the PAC file is adversarial or was modified by a hacker, the attacker could send parts or all of your web traffic through a proxy of his choice.
What is typically recommended is for you to use your own copy of this file (you still have to host your copy securely).
The way I’m looking to solve this is to host the PAC file on a trusted CDN of immutable files. But I have not yet found an appropriate CDN.
This will allow you to review the contents of the PAC file you choose (it’s easy to check the code to see it only points to Google’s DNS servers as blackhole proxies) and have peace of mind that it cannot be surreptitiously updated.
On the other hand, this means you’ll have to update your OS settings if you want to use a newer version of the file.
Another approach I’m going to investigate to solve this security problem is trying to host the PAC file on the device itself. This would mean installing an iOS app containing a PAC file and referencing that file from the network settings of the OS. I’ll post an update once I try.
Any other ideas are appreciated.
Using Google DNS as blackhole
The idea of using Google DNS servers comes from the FAQ of Weblock, an iOS app which generates PAC files. The FAQ offers a good explanation for this choice:
iOS requires dummy proxy to be a valid IP address accepting connections (so it’s not possible to use local IP address of your device, since there is no open port to connect to).
It’s really responsive, fast and stable anywhere in the world.
It’s NOT ABLE to handle HTTP/HTTPS traffic, since it’s a DNS server (it handles an entirely different protocol). It immediately closes the HTTP/HTTPS connection (which is perfect!).
It’s widely recognized and well known IP, so you don’t have to be concerned about your privacy. We’re quite sure Google is not logging all web connection attempts made while blocking content from your device, since this dummy proxy is actually a DNS server supporting a different kind of requests.
A while back, one of my nephews asked me how computers work. During our recent sailing trip, I spent some time with him to answer that question. I will share the introduction I gave him over the next few posts.
Feel free to drop a comment if something needs elaborating. A later post will list technical references for further reading.
“How do computers work?” can be answered at many levels, just like “How does biological life work?”. For life, you can explain that there is an ecosystem of plants and animals, the interaction of animals, the physical and behavioral attributes of individuals of a specie, the function of different organs in their body, the cellular structure of each organ, or the atomic structure of different types of cells.
For computers, there is a similar hierarchy of abstractions: ecosystem of computers (networks), individual computers formed of large components (screen, keyboard, proceesor, memory) and software, circuits forming processors and memory, and the atomic-size elements (transistors, wires) forming those circuits. At a high level, you plug the power, keyboard and screen. At a low level, electrons flow through circuits and light up the display.
I will mainly focus on the hardware part, starting from the bottom (transistor, see next post). We’ll build up to a processor by assembling simple and small components into more advanced and larger components. I won’t discuss the software part much (maybe later).
It is useful if you have been exposed to basics of software programming (mathematical primitives, conditionals, loops, variables, functions/modules), as the computer we will “build” will implement those instructions.
I will also assume that you are familiar with logic (booleans, AND/OR/NOT operations) and binary representation of numbers (base-2/binary 110 is base-10/decimal 6; in binary 110 + 1010 = 10000 just like 6 + 10 = 16 in decimal).
Before laying the first brick, let me give an overview of what we are going to build. The processor is the central component of a computer. At every tick of the clock, it reads an instruction and executes it. In a sense, the processor is like a dull but diligent factory worker who follows a detailed recipe or script (1- “take a screw from shelf A”, 2- “take a part from shelf B”, 3- “attach the screw to the part”, 4- “put the result in a bin”, 5- “if no screws are left, call the supervisor”, and 6- “start over at step 1”).
The processor can execute different types of instructions, such as “read input number from memory A”, “add two numbers”, and “write output number into memory B”. The processor normally follows the instructions in order, but it can be instructed to jump to a different instruction (“jump to step X”, or “if number is zero, then jump to step Y, otherwise proceed to next instruction”).
Recipes are called algorithms. You can solve complex problems with a long list of such simple instructions, just like you can manufacture a car with a worker following a long list of small steps.
Next time, we’ll start our pyramid by looking at transistors. We’ll then assemble transistors to make simple logical components (AND, OR, NOT), followed by slightly more advanced arithmetic components (ADD). After that we’ll look at stateful components (used to store information) and build a simple processor and finally computer.